PRTG 9 Manual: Remote Probe Setup
This section will guide you through some easy steps to set up a remote probe.
- Step 1: Prepare Core Server
- Step 2: Settings in Web Interface
- Step 3: Download and Install Remote Probe
- Step 4: Configure Remote Probe Connection
- Step 5: Approve New Probe and Start Monitoring
- Debugging Probe Connection Problems
Before remote probes can connect to the core server you must edit the relevant settings in the PRTG Server Administrator.
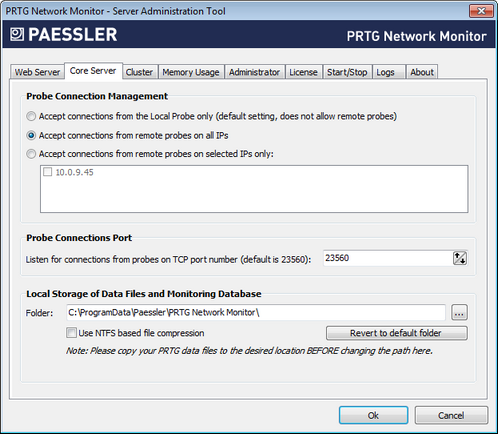
Core Server Settings in PRTG Server Administrator
By default, a core server accepts connections from the Local Probe only. This setting does not allow remote probes, which is the most secure setting. In order to allow external probes to connect, please change to the Core Server tab, and in the Probe Connection Management section, choose one of the following options:
- Accept connections from remote probes on all IPs: We recommend using this setting for easy setup.
- Accept connections from remote probes on selected IPs only: Specify the IP addresses that will accept incoming connections.
- As Probe Connections Port, you can leave the standard port number, even when configuring several probes. Please make sure this port is not blocked by firewall rules on your core server's side. You have to configure the same port number in your remote probe's settings, so please save it for later use.
When you are done, click OK to save your settings. The core server process must be restarted so that the changes take effect.
For detailed information about these settings, please see PRTG Server Administrator (Core Server) section.
Step 2: Settings in Web Interface
Login to the Ajax web interface. From the main menu, select Setup | System Administration | Probes to access the probes settings.
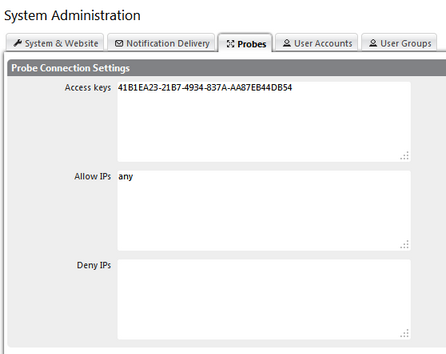
Probes Settings in System Administration
- From the Access keys field, copy one access key you will use for the remote probe connection. You can also enter a new access key if you like. In any case save the correct access key for later use.
- In the Allow IPs field, enter the IP address of the computer you will install a remote probe on. To make things easier, you can also enter the word any; this will set the core server to accept remote probes connecting from any IP address.
- Make sure the IP address of the computer you will install a remote probe on is not listed in the Deny IPs field.
For detailed information about these settings, please see System Administration—Probes section.
Step 3: Download and Install Remote Probe
From the computer you want to install a remote probe on, connect to the Ajax web interface, download the setup file and install it. For detailed instructions, please see Install a PRTG Remote Probe section. Note: You cannot install a remote probe on a system already running a PRTG core installation.
At the end of the remote probe installation the PRTG Probe Administrator will be started (or you can start it manually from the Windows start menu later).
Step 4: Configure Remote Probe Connection
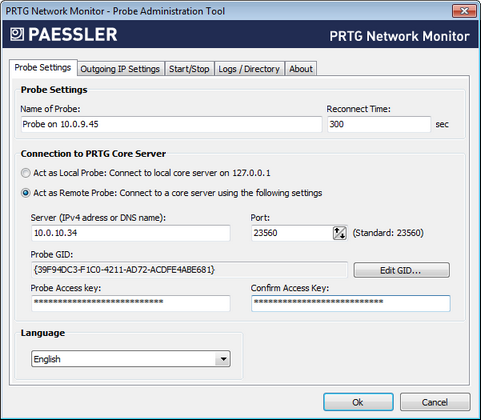
In the PRTG Probe Administrator on the Windows system you have installed the remote probe on, please configure the connection to the core server.
Probe Settings in PRTG Probe Administrator
In the Connection to PRTG Core Server section, select the Act as Remote Probe option. You can then edit the following settings:
- Server: Enter the IP address of DNS name of the core server the remote probe will connect to. If Network Address Translation (NAT) is used, this must be the IP address that is externally visible, as the remote probe will connect from outside of your network.
- Port: Enter the port number the remote probe will connect to on the core server. This number must match the one set in Step 1.
- Probe Access Key and Confirm Access Key: Enter the access key the probe will send to the core server. You have saved this key in Step 2. This key has to match exactly the one shown in the web interface's probes settings, so a connection can be established.
For detailed information about these settings, please see PRTG Probe Administrator section. Click the Ok button to confirm your settings and to start the probe service.
Step 5: Approve New Probe and Start Monitoring
When a new probe connects to the core server for the first time, a new ToDo will be created and it will show up as a new object in the device tree of your setup.
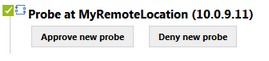
Approve New Probe
Please click on Approve New Probe to fully enable the probe. You have to do this once for every new probe. Once approved, PRTG automatically creates a set of sensors for the probe to ensure that bottle-necks on the probe will always be noticed. We recommend keeping these sensors. You can now create groups, devices and sensors for monitoring via the new probe.
Debugging Probe Connection Problems
If you have trouble with the setup of remote probes please look at the probe's log files.
The probe process writes log files with a file name in the format PRTG Probe Log (x).log. Please open the one with the most recent date.
For a correct connection the probe log should look similar to this:
11.11.2010 16:15:15 PRTG Probe Server V8.1.2.5101
11.11.2010 16:15:15 Starting Probe on "WINXPVMWARE"
11.11.2010 16:15:15 Data Path: C:\documents and settings\All Users\a[...]
11.11.2010 16:15:15 Local IP: 0.0.0.0
11.11.2010 16:15:15 Core Server IP and Port: 10.0.2.167:23560
11.11.2010 16:15:15 Probe ID: -1
11.11.2010 16:17:01 Connected to 10.0.2.167:23560
11.11.2010 16:17:06 Login OK: Welcome to PRTG
If the connection fails, for example, due to an incorrect Access Key, you will see:
11.11.2010 16:31:02 Try to connect...
11.11.2010 16:31:02 Connected to 10.0.2.167:23560
11.11.2010 16:31:07 Login NOT OK: Access key not correct!
Keywords: